
Step By Step Guide on How to Use Network Upload to Import .PST file in Microsoft 365
In this demonstration, we will upload the PST backup of
Megan’s email to Joni’s Email. Below picture is of Megan’s where there are only
3 emails.

The .pst backup of this email is available on the folder
name “megan-pst” .

Before importing the PST file, you need to be assigned with
the “Mailbox Import Export Role” to create import jobs. By default, this
role isn’t assigned to any role group in Exchange Online.
To assign the Role follow the steps below:
-Go to admin center and click on Exchange

In Exchange Admin Center,
-Click on Admin roles & Click on Organization Management

-Assign the User’s or the group for “Mailbox
Import Export” Role.

-Now go to permissions, select the role, and Click on Save

-You may face the issue below. Don’t be panic, try to save
with classic exchange admin; try with different browser or wait and try after
some time.

Mailbox Import Export role is now assigned. In
addition to this role, you also have to be assigned with “Mail Recipients”
role in exchange Online.

After providing the necessary role permission. Go to the Compliance
Portal

Go to Data lifecycle management -> Microsoft 365 ->
Import -> New Import Job

Enter a Job Name & click on Next

Select “Upload your data” & click Next

Click on “Show Network Upload SAS URL”

Now Download the AzCopy tool to Upload your files.
Download link: https://aka.ms/downloadazcopy

Install the AzCopy Tool


After completing, the installation process, open the AzCopy
with administrator privilege.

Now you’re ready to use the AzCopy tool to upload PST
files to Microsoft 365.This tool uploads and stores PST files in a
Microsoft-provide Azure Storage location in the Microsoft Cloud.

Azcopy.exe
/Source:”\\XPS-13\Users\XPS\Desktop\megan-pst " /Dest:”https://47***********.blob.core.windows.net/ingestiondata?sv=2015-04-05&sr=c&si=IngestionSasForAzCopy***************&sig=X2yc*****************VjP3W4DW******3D&se=2022-10-29*********3A09Z”
/v:"C:\Users\XPS\Desktop\Log1\azcopy.log" /Y
Where,
/Source:”\\XPS-13\Users\XPS\Desktop\megan-pst” is the source location (For example: megan.pst file location)
/Dest:”<SAS
URL>” is the
destination location
/v:"C:\Users\XPS\Desktop\Log1\azcopy.log" /Y where log is saved. (Create a log folder and include the path)
Based on your .pst file it will take time to process


Once you run the above command successfully, you will be able to see the output log in the log1 folder

Now
you are ready to proceed with the next step that is preparing a CSV file. But
before proceeding to the next step you can also verify that the files has been
uploaded to the azure storage explorer successfully.
(Note: Verification
in Microsoft Azure Storage Explorer is optional and is not mandatory)
To verify, download & install Microsoft Azure Storage
Explorer. Connect using the SAS URL.

Paste the SAS URL

Connect

Now you can see the Megan.pst has been uploaded to azure
storage and its verified that the megan.pst file is now upload to azure storage
but still it need to be uploaded to the user mailbox.

Leave everything as is it in the picture but under the Name field enter the .pst file name & in Mailbox field enter the email address in which you want to import.
(Note: You
can also use the Target folder as /Inbox/OldEmails)

Now go back to the previous steps where we left and select
the options available in point 4. & Click on Next.

Select the CSV file and Validate
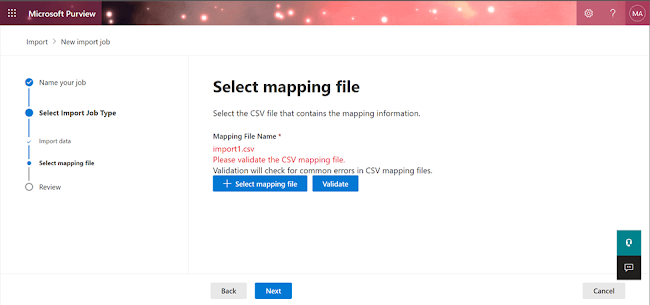
After the successful validation click on Next

Submit

You've added an import job "import" into Office 365.

Analysis in progress

Analysis has been completed. It will take few minutes or few
hours to complete the process.

Click on the Import Job that you have created. After
clicking the Import Job, you will see the Import to office 365
option available.

Click on Import to Office 365

Choose
as per your requirement. If you want to apply the filter, then choose the first
option if not choose the second option. For this demonstration as I want to
import everything, I have selected the second option.

Click on Submit

Upload to the cloud has been succeeded and the Job will be
imported. Check the progress column on the import page to see how much data’s
been imported.

Click on refresh, you will be able to see the import status.
This will take few minutes to hours to complete.

Import Completed

Click on the import Job for more information.

The megan.pst is uploaded and the emails are now displayed in the inbox folder of Joni
Sherman.
